The Gears of the Machine: Exposure and Histogram
This weekend several students wrote to ask why their pictures are so dark.
Right on time! This is the point in the term when that question always surfaces. As soon as we start printing in earnest, the abstraction of camera exposure takes on a newly practical necessity. It seems that no matter how shutter speeds and f-stops are explained, the need for a correctly balanced exposure suddenly becomes urgent once the picture becomes physical as a paper object.
These days I'm primarily teaching with digital cameras, but the dynamic is similar when teaching film photography. Whether in a darkroom or in a computer lab, it's not until you give up trying to print an underexposed frame that you return to the basics of proper exposure. The tools different, of course, but in this basic fundamental they are remarkably similar: exposure is key, and underexposure is deadly.
Drilling yourself in the basics of exposure is a good way to start understanding the tools of photography. Whether you're using or film or a digital chip, there's just no substitute for memorizing the specifics of your equipment—i.e., the progression of shutter speeds and f-stops. Neither are there any sure-fire ways to leap-frog the learning curve as to how different environments require different exposure adjustments, except for experimenting and paying attention to the results. But, with digital cameras, we do at least have some in-camera exposure assistance that can help shorten the feedback loop: the histogram.
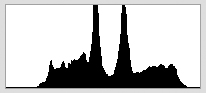
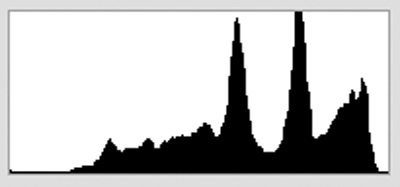
What is a histogram: The histogram is a graphic display of the brightness in your picture. The right side shows the bright pixels; the left side shows the shadows. The relative amount of pixels at any given brightness level is shown by the height of the stack, or mountain. In fact, I look at the histogram as a topographic map: how high are the mountains of bright pixels? How high are the mountains of dark pixels? Each histogram will be different because each picture is different.
How is the histogram created: Camera exposure determines the distribution of the mountains inside the histogram. The more light you give the chip, the more bright-side pixels you're going to see. The less light, the more dark-side pixels. But there is no "perfect" or "standard" histogram; the goal is to capture the correct amount of light for the picture you want to make.
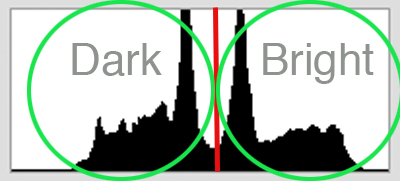
How can the histogram be a guide to proper exposure: After you have taken a photograph, look at the histogram on the camera. Divide the histogram roughly in half.
 Compare the different mountains of pixels. Ask yourself: are there more bright pixels, or more dark pixels? Then ask yourself: is this a dark picture, or, is this a bright picture?
Next, look at the picture itself. Now ask yourself, does this picture "want" to be bright or dark? If your minds-eye sees a bright picture, but the histogram shows a majority of dark-side pixels, then you've got a problem: your photo is underexposed. Adjust the exposure and take the picture again.

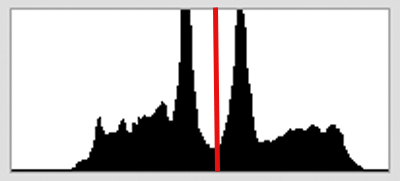
So here's an example: after snapping this picture of the sail and sky (last summer!), I quickly looked at the histogram.
Noticing that the mountains of dark and bright pixels feel roughly similar to each other, I determined that the photo was roughly gray, overall. But in my mind, the picture should be bright! White sail, white clouds: my exposure must be wrong. I increased my exposure (by slowing the shutter or opening up the f-stop), and snapped the picture again.The new exposure and its corresponding histogram (notice that the mountains of pixels have shifted to the right in the graph, indicating that the balance of shadow to highlight has changed):

With practice and patience you'll learn to evaluate the histogram in a matter of seconds. Until then, I recommend that you slow down your process and study the histogram carefully, asking yourself these simple questions: is the histogram weighted to the dark or bright side? Is the picture itself a dark or bright picture?
When you're comfortable with evaluating the histogram based on this rough division into two halves, then begin to distinguish finer divisions. Ask yourself about the deep shadows, mid-shadows, mid-brights, and bright highlights, and whether or not they roughly correspond to the picture in your minds-eye. There isn't any way to precisely correlate these different areas of the histogram with the actual picture on the camera display, but with practice you'll start to distinguish the broad tonal areas that correspond to deep shadows and bright highlights.
But what about the camera-back display screen? Don't be fooled! It's impossible to judge exposure based solely on the display screen on the back of the camera. Not only is the display not accurate, but—especially when shooting outside in bright light—it's very difficult to evaluate the range of highlights and shadows correctly. In fact, the only truly accurate way to judge exposure is by using the histogram.
Note: to use the histogram you must first learn how to view it on the back of your camera. All dSLRs and most snapshot point-and-shoot cameras will show the histogram, but each camera differs slightly in the way it is displayed. In my experience, on most cameras, the histogram can be viewed by cycling through the display menu on the back of the camera. Sometimes the histogram is shown as an overlay on top of the picture; sometimes it's shown to the side of the picture. Bottom-line: figure out from your camera manual how to view the histogram.
The follow up to this discussion of histograms and camera exposure is about how the histogram helps get a better print. And the answer is roughly the same—it begins with properly evaluating the highlights and shadows in your picture. On the computer, though, instead of changing camera exposure, the next step is to use the software tools to adjust the histogram so that the distribution of pixels approximates the brightness that your mind's-eye is seeing.
But remember, whether you're using Lightroom, Aperture, Adobe Camera Raw, iPhoto, or any of the multitude of other software options, saturated prints with bright highlights and deep shadows require that your initial camera exposure be as close to perfect as you can make it.


Comments